
Shoulder mobility is a hot topic in the functional fitness world, especially now that big, demanding shoulder movements are becoming the new norm in the gym. The days of seeing how many weight clips you can go up on the neanderthal nautilus shoulder press is now a thing of the past. The new movements that we do on a daily basis are not on a convenient guided track that has the range of motion designed for a T-Rex.
If you're going to take functional fitness seriously, it’s time for your shoulders to match the new age of movements, which means you need to be mobile, stable, and strong!
So that’s what we’re going to teach you to do in this article! Besides, everyone knows that flexible, stable, and strong shoulders are extremely sexy! Just look at this handsome specimen:

Read excerpt below with melody of “Beach Boys - Wouldn’t it be nice”
(If you’re a millennial and don't know what I'm talking about, YouTube it.)
Wouldn’t it be nice if we were mobile?
Then we wouldn’t have to stretch so long.
And wouldn't it be nice to lift together
With the form of Dimitry Klokov.
If that song reminds you of a similar daydream you have from time to time, then this article is everything you’ll ever need to get your shoulders into the performance zone. In other words - if you have tight shoulders, this will help make them mobile and ready to kick ass in the gym!
In this article we will explore the following topics:
- How do we make sure every muscle is doing its job?
- Preparing the shoulders for everything, AKA the perfect shoulder warm-up.
- Dynamic mobility drills for all shoulder intensive movements.
- How often should you load the shoulders?
- Using WODprep to prepare for demanding movements.
- How to cool down the shoulders - is this even a thing?
(Looking for hip mobility help? Check out this article.)
How to read this article
If you’re just curious about shoulder mobility:
- Feel free to skim this article, hop around and watch the videos.
- We have a shoulder warm-up in here for you that you can easily download to use before your next workout.
If you want to create lasting mobility changes to your shoulders:
- You don’t need to remember every step, just grasp the general concepts.
- Check out our coaching advice at the end on how to create a life-long plan for iron-clad shoulders.
If you’re an athlete interested in performance:
- Pay special attention to whichever section or movement you struggle with. I give you specific drills that you can use next time you're in the gym.
- Determine if you lack mobility, stability, or strength and then work on your weakness.
- Be sure to keep track of how often you are loading your shoulders (we’ll give you a few suggestions).
If you’re a fitness pro, or interested in "geeking out" on shoulders:
- Bookmark this article at your gym, send it to fellow coaches.
- Spread this shoulder mobility gospel to all of your clients and athletes!
- Read every bit!
If you’re struggling with shoulder pain and not sure how to train through it:
- Find out how our Physical Therapists can help with WODprep's Injury Rehab and Prevention.
Want to fast-track your shoulder mobility, stability, and strength? Head here for our proven 8-week course, ShoulderROM.
1. Every Muscle Needs To Be Doing It's Job.
In short, the shoulder is a complex and very unique joint. It is literally a floating system of muscles, bones, ligaments, tendons, and nerves that must all be firing and functioning near perfection to stay super flexy, stable, strong, and pain-free.
When you move your shoulder you are producing force couples. A good example of a force couple is turning your steering wheel. If you do it the right way, one hand rotates the wheel up and while the other rotates the wheel down. This is a force couple.

Now, when your shoulder is producing a force couple, in order for your shoulder to execute that movement properly, the opposing muscles needed to produce the force couple must be in balance. That means they have adequate strength and proper firing sequences. There's always a yin to the yang.
For example (technobabble rant here, but we promise it will be brief) when your shoulder goes into upward rotation, a scapular force couple is produced by the trapezius and serratus anterior.

We have the upper trap creating some elevation, the middle and lower traps producing medial stabilization and helping in upward rotation, and the serratus anterior producing upward rotation.
Did I lose you there?
Basically your muscles will do opposite movements to help create one fluid movement, and just like the hands on the steering wheel that must move in congruence, so must your muscles.
You can be jacked AND flexible. Take a look at the guy below. He has done his job in making sure every muscle is doing its intended purpose.

Kids, don't try this at home. Courtesy of @jujimufu
Ever watched high-level gymnastics? You may have heard their shoulders being referred to as “boulder shoulders.” It’s a pretty accurate reference - their shoulders look bulletproof! They have balance and harmony in the shoulder girdle that unlocks flexibility, stability, and strength all in one.


2. Preparing Your Shoulders: The Perfect Warm-up
A proper warm-up should be a practice that is designed to get your shoulders ready for a task that you are about to ask of them, or something that will help increase your skill in certain desired movements. It’s the quickest and easiest way to start challenging your shoulders for the better.
Walking into the gym right after work, you can’t expect to immediately jump into some high performance lift like the snatch or OHS and have super flexy and sexy shoulders. You need to gradually prepare your shoulders to get into these demanding positions.
Let me quickly sum up what a good warm-up looks like below.
Shoulder Warm-up Summary
First and foremost, if you’re an athlete who does a lot of dynamic movements (i.e snatch, jerk, overhead pressing, pull-ups, dips, etc), the first thing you should ditch is the foam roller and static stretches (you can do those another time, but they are a waste of time during your warm-up).
Prep for dynamic movements with dynamic movements. It’s like 1+1=2.
If you are a modern homosapien, you undoubtedly spend most of your day within some form of shoulder internal rotation and protraction - AKA the sitting position.
I’m not only talking about people sitting at a desk job either. Let’s think about other times when I’m sitting, like when I’m writing this article right now, or when we eat, or sitting watching tv, or driving a car, you get the jist. Basically everything you do is in that forward sitting position, which creates internal shoulder rotation and protraction.
So when you go into the gym and want to look like Mattie Rogers when snatching, you need to do your due diligence to get out of the slouched eating position (this is what we will call your forward rolled shoulder position that your grandmother hates).
First thing you should start with is some dynamic stretching to open up all those internal rotators and protractors like we mentioned above. Which would look something like this:

We use the dynamic movement to create short term increase in range of motion at the joints involved and assess how you are feeling before starting your session. The repetition of movement quickly allows you to move through similar movements that you'll be doing at higher intensity to gauge how things are going to go. Then, we look to create some activation in areas that haven’t been used much that day. We’re looking to run an assessment of how the posterior muscles of the mid-back are feeling.
This would look something like this:

So those are the first two steps:
- Mobilize the areas that you will be involving in your session.
- Create activation in the opposing muscles that have been fighting that protracted shoulder position.
Finally, we like to do some movement reintegration that involves a stability factor.
If we’re looking to prep for some split jerks or push jerks, reintegrate that new mobility and activation with some movements similar to these below.
Half Kneeling Single Arm KB Press:


Single Arm KB Overhead Walk:


That’s what a good warm-up looks like. SIMPLE. Mobilize. Activate. Stabilize.
It takes no longer than 5-10 minutes. It gets you out of the slouched sitting position and allows you to get a feel for how you should choose weights and movement variations for the session. It’s super effective and could be done before every shoulder intensive session. Just by adding this alone you will be that much closer to creating shoulders made out of Adamantium (X-Men reference there).
Ditch the static "stretching"!
To be blunt, I need you to retrain your thought process right now when it comes to shoulder mobility. We do not need to be in hunt of a “stretching feeling” when trying to make our shoulders flexible! We do not need to have that pulling feeling like you get when you stretch your hamstrings.
The shoulder is an amazing joint that likes to be moved as a whole unit through many ranges of motion to gain mobility, instead of just isolating and hanging on a particular muscle.
A major contributing factor to shoulder tightness is because your body is protecting yourself from yourself.
Your CNS can make a muscle over-active and tight because it thinks that you do not have the strength or stability to stay uninjured in these bigger ranges of motion.
It’s a protective mechanism.
So that’s why we prep for movements, do our warm-ups, and gain the quickest amount of flexibility by doing dynamic warm-ups.
3. Dynamic Mobility Drills
When you go looking for "that stretching feeling", that is actually the stretch reflex you are tapping into. It's a little alert system in your muscle that kicks in when you start to take it too far, which if you go too far it’s job is to pull the muscle back to a shorter length, so that you don’t injure it.
By doing dynamic movements to gain mobility, we are actually tapping into that alert system multiple times in a safe manner that allows the brain to recognize that it can go further. Instead of one long, continuous slow stretch we're going to see more change with several, short dynamic movements.

This is what we want you to understand: we obtain mobility from movement. We do not just hang on a band for 2 minutes or sit in a posture for 5 minutes while watching a TV screen. If you want lasting change, you must take your body through dynamic movements (positions of continuous movement).
So, despite what some flexible kittens say, you need to ditch the outdated shoulder mobility dogma. STOP searching for that hanging stretching feeling and embrace the dynamic approach! Movement creates movement.
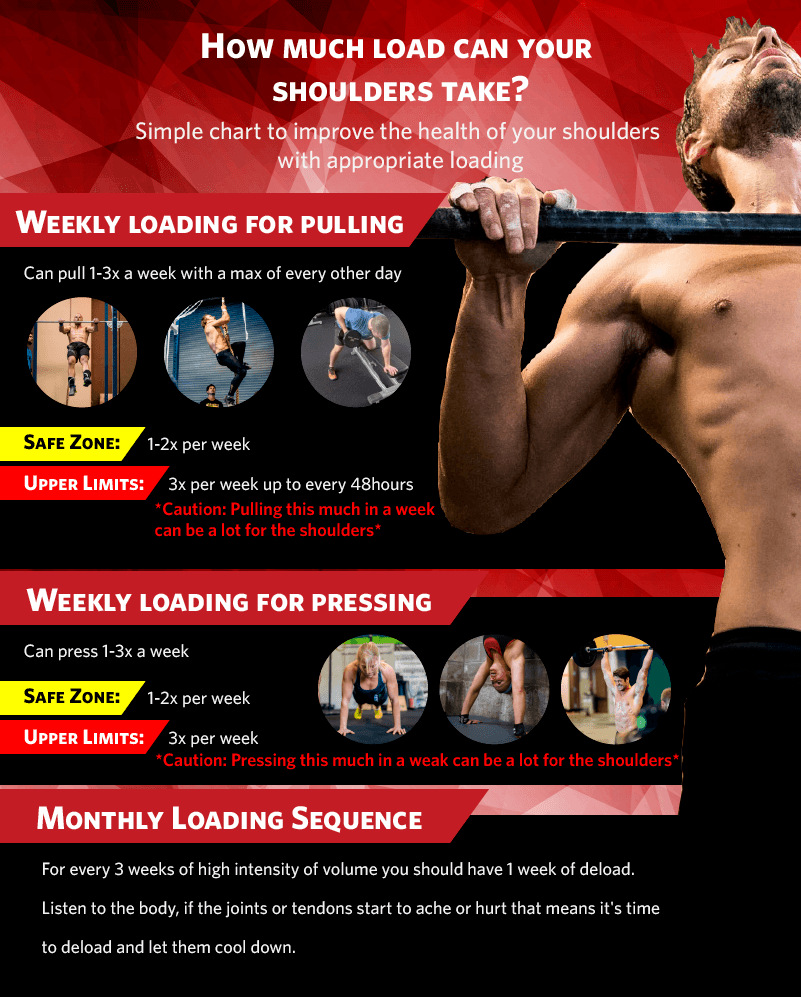
4. How Often Should You Load Your Shoulders?
I’m gonna go a little Soviet Union on you. Besides having the best PEDs, the Russians produced some of the strongest weightlifters of all time.
What they deemed as the perfect amount of strength training for the upper body was twice a week. As far as pressing goes, this is pretty sound logic and is a good starting point for most intermediate to advanced competitive exercisers.
So you’ve pressed twice in a week, well what about pulling?
To help with managing training load and allow time for recovery, pulling (i.e pull-ups, pull downs, rows, etc) every other day is a good starting interval.
But to help dissipate fatigue there should be at least a 48 hour break in between.
If you do pull-ups on Monday and then bar muscle ups on Tuesday, no wonder you are possibly feeling run down. You just did lots of pulling two days in a row. If I was your coach I’d tell you to do a little bit less tomorrow.
When it comes to loading, you have to look at the big picture. When you train you break down tissue so your body has to build it back up. This creates a need to rest and recover. We can all agree on this, yes?
That’s where a pivot comes in.
I know taking a break or backing off the pedal is taboo in the CrossFit realm, but it is a reality. Rest is very important.
You need to learn the warning signs that you need a deload week. Feeling run down or burnt out can indicate it might be time to pivot or deload, or possibly adjust your current training load! Deloading or pivoting doesn’t mean stop ALL things and watch Netflix all day, it just means either change up exercise selection, lower the volume, weight, or all of the above.

5. Using WODprep to Prepare for Demanding Shoulder Movements
In this section we are going to offer instructional prep videos for a variety of CrossFit® movements that could potentially be hindered by your lack of shoulder performance.
Each video offers you some quick mobility hacks that will produce lasting changes if you perform them regularly.
Movement #1: Snatch/Overhead Squat
Coach’s Corner: The OHS/Snatch is always the most troubling and demanding movement that we learn and have to coach. Getting into this position, especially if you’re new to it, is very difficult to execute properly. It goes against most of your natural reactions to carrying weight over your head and squatting with it. Which is why most people struggle with catching the bar forward or catching with bent elbows.
In the below video we give you three quick exercises to help you gain the mobility necessary to execute the movement at a high level. If you are already at a high level, we can always get better.
Exercise 1 - Pec Fly Stretch

Coaching Cues:
Grab a light pair of dumbbells or a pair of fraction plates 2.5-5lbs. Start with your arms straight towards the ceiling. First (shown in top picture) drop your hands and arms into extension. Think - ”pull your arms towards your sides.” From there you will roll your hands open towards the ceiling while externally rotating the shoulders. Think - “show your armpits to the ceiling.”
Repetitions:
Repeat this for 5 reps, and at the bottom of the stretch we want you to perform 5 hard exhales.
Why we like this stretch:
The pecs are often short and tight on people because we spend most of our time spent in the hunched seated position which is not conducive for the snatch. The snatch requires the pecs to help stabilize the shoulder in the open posture of the snatch. So this stretch is going to help allow the shoulders to feel more comfortable in the snatch position.
Exercise 2 - Banded Overhead Squat

Coaching Cues:
Take a 10-15lbs med band and execute a banded OHS. Pull the band to the same position that your arms would be during the snatch or the OHS. Think “arms in line with the ears” and then proceed to perform the movement.
Repetitions:
Do the exercise for 2 sets of 10 reps. (This is a good one to superset with the pec fly stretch, i.e do one set of your pec stretch and then one set of your banded OHS)
Why we like this exercise:
Now this one isn’t a stretch, it's an "activation". After we open the anterior structure (front side) with the pec fly stretch, we like to activate the posterior muscles that tend to be a little quiet on novice weightlifters. If you watch the Chinese weightlifting team, they are always cueing to be more active in the back, which is what we're trying to train your brain to do with these three exercises.
Exercise 3 - Behind the Neck Snatch Grip Strict Press + Heels Elevated Overhead Squat

Coaching Cues:
First thing we need is about a 1-2” heel elevation. You can use a 25 lb bumper, or a steel 10 lb plate. Ultimately, we need something to prop your heels that will isolate the T-spine and bypass any lack of ankle mobility you may have. Next thing, we have to find the appropriate barbell. If you are just learning how to snatch you may want to use a 15 lb training bar, but if you’re comfortable with the 45 pound barbell go ahead and use that. When performing the movements we want to practice desired positions. I want you to think about keeping your shoulders externally rotated or armpits facing the wall. Stay away from the forward rolled shoulder position.
Repetitions:
We will do this one for a 10 minute EMOM of 2 BHN Snatch Grip Strict Press and 2 OHS. You will execute one full round every minute on the minute, for ten minutes.
Why we love this exercise:
The best way to get more flexible at a movement is to spend more time under tension in that movement. Most people do not spend enough time drilling technique and positions when they are trying to achieve that position. There is no magical stretch that will help you all of a sudden look like a world class weight lifter other than spending more time at a lightweight in those positions. So try this one out for 10 minutes a few times a week and we can promise you will see an improvement.
Movement #2: The Push Jerk/Split Jerk
Coach’s Corner: The Push Jerk/Split Jerk is a very demanding movement on the shoulders. It’s very reactive meaning when you jump the weight off your shoulders to lock it out, your shoulders have to react to the moving bar as you catch it. These movements really require you to be able to separate your shoulder movement from your torso.
If you have really dominant pecs and neck flexor, catching these in a comfortable position consistently will be tough. Also, when putting volume on these movements it can really make your scapular muscles spaz out due to how dynamic they are. You’ll need to also work on spending more time in these positions and doing endurance work to be able to do these at high volume. So here are three easy exercises to improve your mobility, scapular strength, and stability.
Exercise 1 - Upside Down Kneeling KB Press

Coaching Cues:
When performing this movement, it doesn't have to be too heavy. Focus on keeping the ribs down, locking out with very straight elbows, and pressing in line with your ear.
Repetitions:
Perform this for 2 sets of 6-10 reps. You can do it for a warm-up or some cool down auxiliary work.
Why we love this exercise:
Putting yourself in the kneeling position puts the trunk and torso in a great position and then also locks it in place. When you go to press overhead, you are isolating the overhead movement to the shoulder girdle. It doesn’t allow you to cheat. This will force the shoulders to get mobile because you are putting it in a demanding position underweight which will speed up your mobility results.
Exercise 2 - Banded Angels

Coaching Cues:
Use a med band with 5-15lbs of resistance. Pull the band in line with your ears and create an angle like a circular motion while keeping your palms facing forward. Think of making a snow angel as a kid - with palms facing forward. Also, remember to keep your torso down so we don’t practice this range of motion in an over extended position.
Repetitions:
Do 2 sets of 10-15 reps; this is a good one to superset with your upside down kneeling kb press.
Why we love this exercise:
This exercise is a great one to strengthen the scapula in a lot of different ranges of motion. It will also teach you how to be active in those shoulders while catching a push jerk or split jerk. It will create more skill between your front and back muscles of the shoulders and help progress the movement towards your goal.
Exercise 3 - Two Behind the Neck Close Grip Strict Press + Two OHS

Coaching Cues:
When performing this exercise, only bring the hands to a width that is comfortable. It should be the same as when you are pressing from the front. We are going to elevate the heels with some plates again to bypass the lack of ankle restrictions. Perform two strict behind the neck strict press plus two OHS each set. Focus on nice straight elbows and allowing the bar to stay on your midline while your head and chest go forward of your headline.
Repetitions:
Perform 2 BHN Strict Press + 2 BHN Close Grip OHS, EMOM for 10 minutes.
Why we love this exercise:
First, the BHN strict press forces you to gain some mobility and forces you to learn to keep your back shoulder muscles more active through the pressing motion. Then we love the OHS with close grip because it teaches you to keep the bar inline with your midline while your head and chest goes forward of the bar. Just like it does when catching the push jerk or split jerk.
Movement #3: The Front Rack
Coach’s Corner: While the front rack is not a movement but rather a position, it’s a position that causes just about every beginner some level of difficulties. Going into that wrist extension is not something we do regularly in everyday life. However it is a ROM that everyone should have. In this video we are specifically attacking the restrictions at the shoulder that may be influencing your front rack, not the wrist.
Exercise 1 - Dumbbell OHS

Coaching Cues:
Perform this exercise with heels elevated to bypass any ankle restrictions. The dumbbell can be light 5-15lbs. This is an active thoracic extension exercise instead of a passive one like laying on the foam roller. So think "tight middle back" while performing this exercise. Perform the squat with good mechanics, knees tracking over the toes and nice straight elbows underneath the dumbbell.
Repetitions:
Perform this for 2 sets of 10 reps
Why we love this exercise:
This exercise allows you to get a nice thoracic stretch through active motion instead of just laying over a foam roller. Many athletes who are a little more rounded in their middle back will struggle with the front rack position, as they are not used to being in that straight posture or extension of the middle back.
Exercise 2 - Weighted PVC Flexion

Coaching Cues:
When performing this exercise make sure your head, back, and hips are positioned on the foam roller. Take a PVC pipe and put a 5lbs weight on it. Take the PVC overhead with straight elbows and at the end of your range of motion, give yourself a big and full exhale for a few breaths. The exhale will pull down the ribs and flatten the back which in turn will separate your shoulder girdle movement from your torso.
Repetitions:
Perform this exercise for 5-8 reps with 3-5 deep exhales every rep.
Why we love this exercise:
If you’re a new athlete or someone who really struggles with overhead mobility you probably also struggle with the front rack. If that’s the case, then getting better at OH shoulder mobility will have great translation to the front rack.
Exercise 3 - PVC External Rotation Arm Bar

Coaching Cues:
Take the PVC in hand and hold it perpendicular to the floor. From there rotate the PVC to the outside of your shoulder/hand. If I’m holding it in my right hand I would turn it out to the right. After that, proceed to grab the PVC with your left hand from underneath your right arm and pull the PVC with the left hand to create the stretch. Make sure your right elbow is facing forward while doing this stretch, this way you directly mimic the front rack. Many people have the tendency to turn the stretched arm out the side.
Repetitions:
Try this one for 2 sets of 8 on each arm. Pulling and holding the stretch for 5 seconds at a time.
Why we love this exercise:
This PVC stretch allows us to directly mimic the front rack position and take the arm to a further range of motion than it would go to in the front rack position. So those that are limited in their external rotation capabilities, this will be a nice and quick opener for you to do right before you get in the actual front rack position.
Movement #4: Pull-Ups
Coach’s Corner: For pull-ups, we are actually going to talk about the kipping part of the pull-up and more specifically the bottom part of the kip, the extension piece.
Many athletes (especially masters) have a tough time hitting full global extension in the kip which makes them leave reps on the floor. This is applicable to any kipping motion but for today’s sake we are applying it to the pull-up. So check out the video to make sure you are getting the full lowdown on these demanding drills.
Exercise 1 - Single Arm Lat Stretch

Coaching Cues:
First thing to do is lay flat on the foam roller. Also, make sure you have a 2.5-5lb weight handy. During this stretch, if I’m stretching my right arm I want to have my right leg up as well (you may feel a bit off balance at first). If I promote flexion at the leg it will help the shoulder promote better flexion as well.
From there, make sure when executing this stretch you focus on keeping the elbow straight as you take the plate overhead. By keeping the elbow straight and laying on the foam roller, it forces the shoulder joint to execute full shoulder flexion and doesn’t allow you to cheat the movement.
Repetitions:
Perform this exercise for 2 sets of 8-10 reps on each arm. Holding for 2-3s and performing a full exhale every rep.
Why we love this exercise:
If you’re someone who struggles with full kipping extension this is the first piece to locking in a great kip. First you have to learn how to utilize your shoulders as your kip generator rather than your legs. This exercise is going to help your body learn how to get into some shoulder hyperflexion, and by adding the weight it will help the shoulder be better equipped for the load it will receive during your kip.
Exercise 2 - Weighted Hollow Shots

Coaching Cues:
Load a barbell with 2.5-5lbs plates. From there, we are going to lightly shoot up into the hollow position all while keeping our hands on the bar and not allowing the bar to come off the ground. What we want you to think about is forcing the shoulders to stay on the ground, not necessarily making the weight keep your shoulders down. Think about actively keeping the shoulders on the ground as you hollow out, not allowing the bar to do the work. This is helping your learn to separate your shoulder movement from your rib cage/trunk.
Repetitions:
Execute this exercise for 2 sets of 8 reps.
Why we love this exercise:
This is about mental cueing just as much as it is about stretching. It allows you to learn to create hyper flexion in the shoulder without forcing the trunk to get you there. When we go into the bottom of the kip, that shoulder needs to be fully capable of going into hyper flexion on it’s own if it is going to stay healthy after copious amounts of reps. These first two exercises are what really teaches us to get rid of those bent elbows at the bottom of the kip.
Exercise 3 - Bridge

Coaching Cues:
If you’re not already great at bridging or if you’ve never tried, be sure to have some form of elevation for feet. The elevation will take the pressure off of the lower back and teach you how to create more extension in your middle back on the bridge.
When driving up into position be sure to make sure you are keeping your glutes tight, feeling the pressure in the middle back, and getting your head through your hands. Think “head through the window” when trying to get your head through your arms. We want you to drive your head through so that you load the arms more which will have better correlation to your kip.
Repetitions:
Execute this for 2 sets of 6-10 bridge pulses. For the pulses, you’ll simply drive the head in and out. Or if this is something you struggle with, just work on getting into the bridge 3-5 times while holding it for as long as you can. It is very demanding, so work on just getting into position first if it’s difficult for you.
Why we love this exercise:
This one speaks for itself. It is the exact same position as the bottom of the kip except with more ROM and it allows you to spend more time under tension in this position. I have seen this exercise alone help a lot of athletes take their kipping game to the next level. It helps gain fluidity in this movement that once looked rather janky.
Movement #5 - Handstand Push Ups
Coach’s corner: With this movement, it isn’t necessarily the shoulder mobility that limits people in this exercise. It is usually the trunk mechanics that hinder performance, however your trunk and your t-spine are what your shoulders are using for the foundation. For this movement, even though we are cueing trunk mechanics rather than shoulder stretches, it is a very vital yet limiting part in this demanding movement.
Exercise 1- Split Dual KB Shoulder Press

Coaching cues:
Get a light pair of kettlebells to perform this one. Then you will get into your best side split and perform some overhead shoulder presses with the kettlebells. When doing this one, focus on keeping your ribs down through the whole pressing motion. Lastly, when locking out, drive your head through and get those arms in line with your ears for full shoulder flexion.
Repetitions:
2 sets of 6-8 reps (don’t burn out shoulders as we are working on trunk and shoulder mechanics).
Why we love this exercise:
The split KB press puts us in a very demanding position and will bring to light any mobility restrictions. By putting the legs in a split, it becomes difficult to maintain good position in the torso and the shoulders. This is why it has great carry over to the HSPU. If you break in your midline in the HSPU with your ribs flaring out you will leave a lot of reps out on the floor because you are making the movement way less efficient. So this teaches you to keep good mechanics in a demanding position, so you can get the feel of keeping that same position in the demanding position of the HSPU.
Exercise 2 - Banded Push Aways

Coaching cues:
You can have two light jump stretch bands, with or without the rings attached. We prefer to do it with the rings attached. Keep your body as upright as possible to mimic the HSPU or pressing overhead. While pressing the bands out and overhead, focus on keeping your ribs down as you lock out your arms.
Repetitions:
Do this one for 2 sets of 10 reps.
Why we love this exercise:
This is a great one to teach people how to integrate their core mechanics into pressing positions - especially the HSPU position. With the band pulling you backwards, it forces your abs to engage and helps strengthen your anterior stability. We need to make sure our athletes have enough anterior stability to execute and perform demanding positions like the HSPU effectively.
Exercise 3 - Extension slides

Coaching cues:
When performing this exercise try to keep your shoulders straight or with a slight bend if you feel pressure in the elbow. Drive forward and hold the stretch for a few seconds before sliding your hips back. You should feel a nice stretch in the front part of the shoulders and biceps. Keep this one dynamic by going in and out of tension and only holding a little while each rep.
Repetitions:
Do this one for 2 sets of 8-10 reps
Why we love this exercise:
This is great to help not only stretch out your shoulder flexors and biceps but it helps develop some rear delt stability and gets your triceps strong! This is great for the HSPUs even though it’s extension (the polar opposite of HSPU), because it really gets the pressing muscles nice and strong. Now, we can stay tighter in our back while we press which compliments the better core and trunk mechanics greatly.
6. Cooling Down The Shoulders... That's A Thing??
Believe it or not, cooling down the shoulders is a thing. So let’s dive right into it and show you how dedicating 5 minutes to the end of your workout can make a huge difference.
Movement #1 - Rock Back Breathing Technique
Coaching Cues:
It is essentially a modified child’s pose. We start in the crawling position with our knees stacked underneath our hips and our hands underneath our shoulders. From there, just drop your elbows straight to the ground without moving your hands.
Once you’re in this position you’re going to focus on full breaths with full/hard exhales. And by hard and full I mean ALL the way out. Lastly, I want you to focus on keeping a rounded back while you breathe. I want you to think about breathing into your middle back and feeling your back expand on your inhales.


Repetitions:
Do this for 15-20 breaths.
Why we love this exercise:
Metcons can be very tough and taxing on your system, but that's the point! Some people would rather wind down while at the gym or box rather than bringing it home with them. This can be a great addition to your post workout routine to help wind down, catch your breath and get ready to head back home.
Movement #2 - Ring Lat Stretch

Coaching Cues:
Grab a set of rings and go into a deep, feet together squat while holding the rings. From here we are going to do the same breathing pattern as before. Feel your middle back expand and as you exhale, blow everything out till your abs get rock solid and really close your core down.
Repetitions:
Do this for 15-20 breaths as you start to relax and allow your system to decompress.
Why we love this exercise:
With so much pulling occuring in some workouts, we can expect that there will be a lot of blood flow to the back muscles, which is good! But it can leave athletes feeling tight and full in their back, especially their lats. This is a great movement to help cool down and send some stimulus to that area and try to regain that pre workout feeling.
Executive Summary On How To Keep Your Shoulders Healthy & Strong For A Lifetime.
Alright, so you skimmed the article, you don’t really want to learn the nitty gritty, you just want to know how to simply keep your shoulders strong and healthy. This section is perfect for you.
Here’s a simple checklist to complete 2-3x per week.
- Stay Mobile - The best thing to do is take your shoulders through as much ROM as possible 2-3x per week. One simple way to do this are some Turkish Get-ups! TGUs take your shoulders through just about every ROM and help create stability through those ranges.
- Stay Stable - Carry or lift a single apparatus with your shoulders 1-2x per week. Take a break from the barbell and press some DB’s or KBs. You can also take a KB for a walk over head. Add in unilateral work once a week, too!
- Stay Strong - Do things like overhead pressing, pushup variations and horizontal press and pulling.. We do so much pressing in the functional fitness realm we need to make sure you are keeping consistent with exposure to shoulder stresses.
If you need even more free and awesome coaching on warming up your shoulders, be sure to download the “Ultimate Shoulder Warm-Up.”
If you have read this far, my guess is that there’s something limiting you or causing shoulder discomfort/pain, so my advice would be to practice this warm up, starting tomorrow.
It's designed for anyone and everyone to improve their shoulder performance. It’s a win-win-win.

^ Michael needs better positioning...
Until next time, work on building your boulder shoulders, and be sure to leave some feedback, questions, or comments below! And remember, if you have persistent pain that you don't feel capable of dealing with - our Physical Therapists can help! Head to WODprep Injury and Rehab and Prevention to book a consultation call.
Get your FREE Shoulder Mobility workout!
Great article, Garry!
Thanks for sharing easy and applicable tips EVERYONE should be doing more of.
[…] read it, we actually have the best damn shoulder mobility article on the planet. For real… you should read it or save it for later. It has a specific section in it for pull-up […]
[…] will also help your shoulders feel better in your snatches because if you start catching snatches in a more upright position, you’ll be able to receive the […]
Thanks for sharing these exercise throw to this post.