In CrossFit, there are numerous movements, both simple and complex, that an athlete will learn to complete workouts of the day. For example, the clean and jerk is a complex Olympic weightlifting movement that can increase strength, coordination, balance, and explosive power.
This article will discuss how to clean and jerk, progressions, and common faults seen with the movement.
What Is The Clean And Jerk?
The clean and jerk is most commonly performed with a barbell and is broken down into several positions, including; a “deadlift”, high pull, a “squat”, and finish in the front rack position.
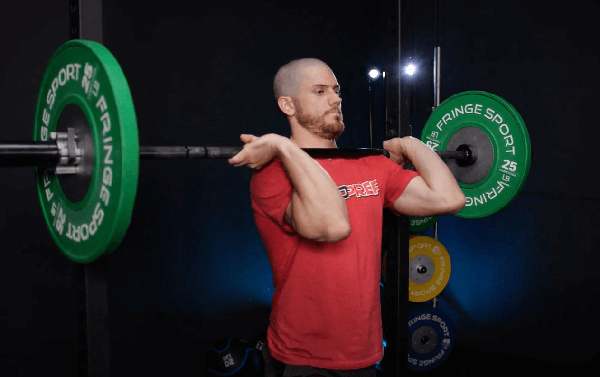
For those who may not know, the front rack position, also known as the “catch position”, is when the barbell is adjacent to the collarbone whilst the elbows are pointing forward, palms facing the ceiling as your fingers hold the barbell steady under the bar.
In sequence, the movement begins with pulling the barbell from the floor to the front rack position. This is followed by a combination of explosive hip extension and press overhead landing in either a partial squat or a split position. The clean and jerk is considered complete when the athlete recovers to a standing position with the hips and knees extended and the barbell overhead with the elbows fully locked out.
When lifting heavy weights, most athletes will pause, take a breath, and reset their grip after the clean before performing the jerk. However, athletes will cycle the barbell when performed at lighter weights and in workouts.
“Barbell cycling” is specific to CrossFit, which repeatedly turns up in WODs. Cycling is a way to increase the speed and efficiency of the movement and is more common with the power clean and jerk. When cycling the barbell, the athlete will use the power position produced from the hip extension of standing up their power clean to press the barbell directly overhead without pausing.
How To Do A Clean & Jerk
Step 1: The Set Up
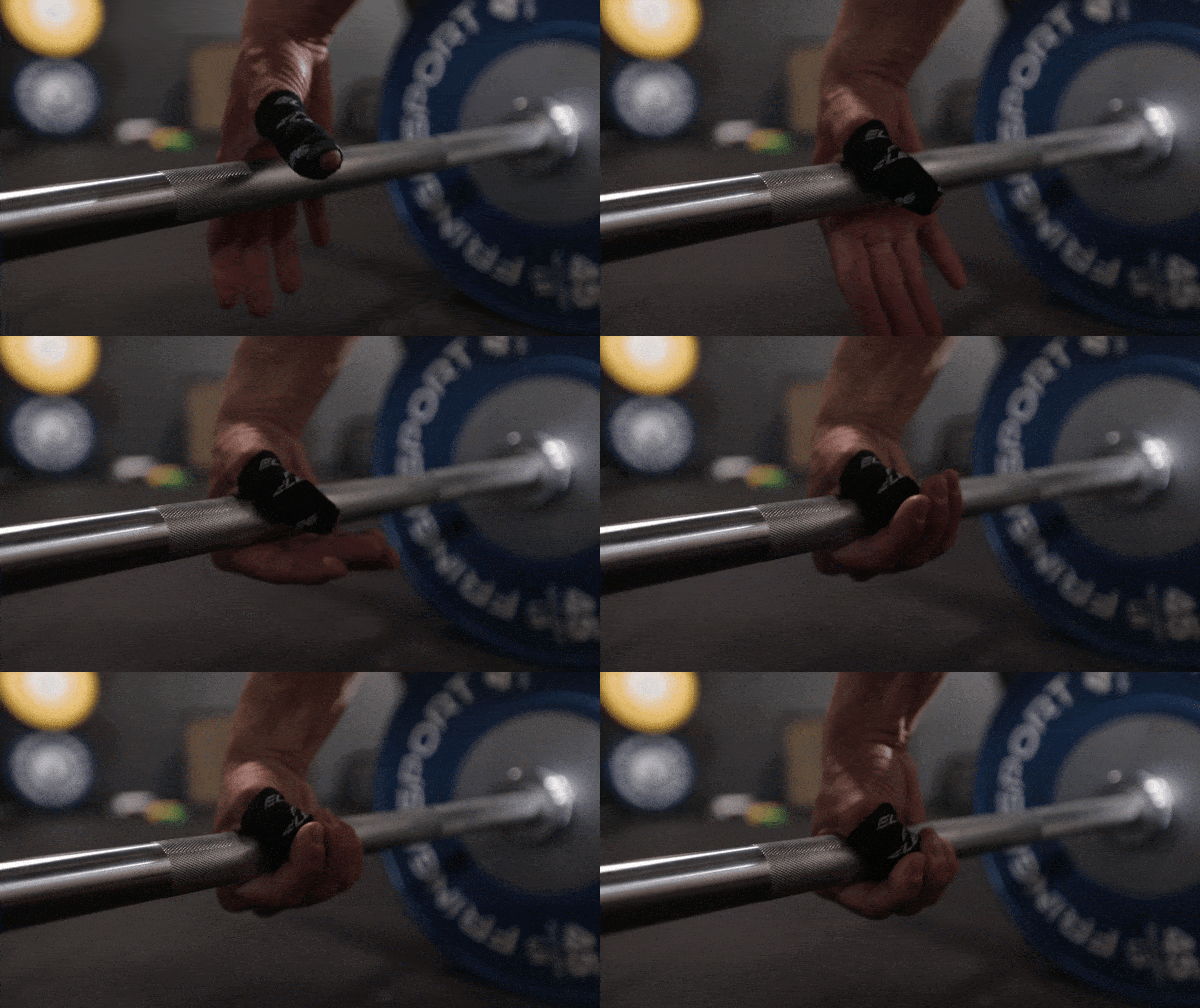
When setting up for the clean and jerk, the barbell should start on the floor if plates are loaded on it or at mid-shin if the barbell is empty. The athlete’s feet should be about hip-width apart, hands on the barbell just outside of the legs, and shoulders just in front of the bar. Make sure to have a hook grip on the bar, where the thumb is wrapped around the barbell, and the other four fingers wrap around it.

Step 2: The First Pull
The first pull is initiated as the athlete pulls the barbell from the floor to just past the knees. The hips and shoulders should raise simultaneously during the first pull. Think about “breaking the bar” in order to engage your lats, keep your midline braced, and stay balanced by keeping your weight in the middle of your feet. An easy trap to fall into with this progression, is letting the bar drift away from your shins. By keeping your lats engaged, and taking your time to concentrate on the movement pattern, will help you avoid falling into this trap.
Step 3: The Second Pull
The second pull is when the barbell travels from the top of the knee into the hip and is accelerated vertically through aggressive hip extension. The athlete will reach “triple extension”, which is when the hips, knees, and ankles are all extended in the pull. To ensure you’re holding the bar at the right height in the neutral position, check where the bar sits on your thighs with straight arms. Typically, you want the bar to sit below your hip crease; when you drill “the second pull” clean progression, you will consistently hit the same spot. When barbell cycling, you will know if you’re proficiently hitting the movement correctly, the bruises on the tops of your thighs will be the same place.
Step 4: The Third Pull / The Catch
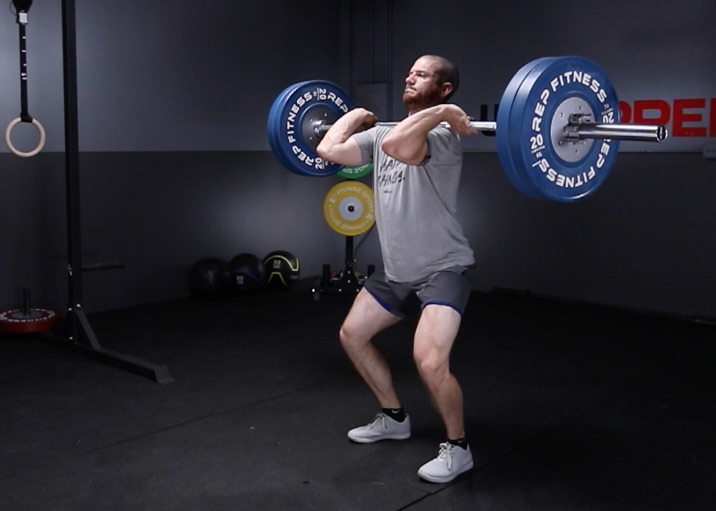
The athlete will pull themselves under the barbell and land in either a front squat (clean) or partial front squat (power clean) with the barbell in the front rack position. In the front rack position, the barbell is resting on the shoulders with the elbows high. The athlete will then return to a standing position with the barbell still in the front rack position. The front rack position can be a limiting factor for athletes when first starting out, and developing better shoulder mobility is recommended if you’re looking to increase your clean and jerk PR.

Step 5: Reset / Prepare For Jerk
To get a better full grip on the barbell and adjust the elbows to just in front of the bar, many athletes will reset their grip as they are standing up, followed by a breath and re-bracing of the core before beginning the jerk.
Step 6: The Dip
Once the hands are in a good position, the athlete will dip straight down into a small partial squat while staying balanced in the foot and pushing the knees down and out. This is loading up power from the legs to prepare for the drive.

Step 7: The Drive / Hip Extension
The athlete should gain the most power from their legs and hips by aggressively driving out of the dip into full hip extension. This power allows the bar to become essentially weightless as it travels vertically.
Step 8: The Jerk
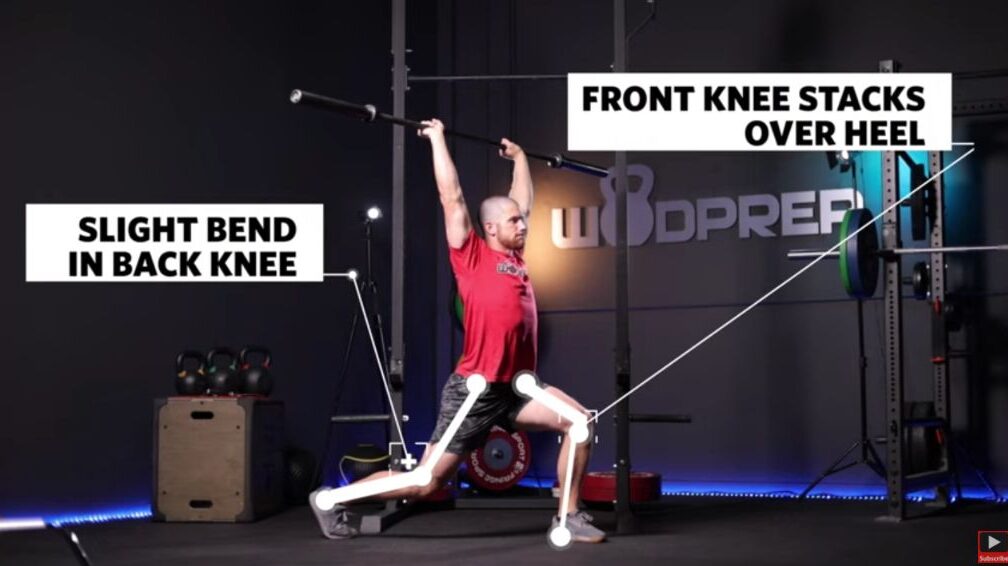
Following the drive, the athlete will need to finish the jerk by pressing under the bar until it is completely overhead whilst timing the landing of their feet and elbow lockout. Most commonly, the jerk will be performed as a split jerk or a push jerk.
Step 9: The Catch
In a push jerk, the catch will be in a partial squat, whereas in a split jerk, the catch will be in a split position. The movement is complete when the athlete recovers to a standing position with the hips and knees extended and the barbell overhead with the elbows fully locked out.
Clean Progressions
Coaches will typically teach athletes clean progressions from the top down to reduce complexity before learning the full movement. Additionally, some less advanced movements should be mastered before learning the clean such as a deadlift and front squat.
If you're looking to improve your weightlifting, check out our 1-on-1 coaching.
The Deadlift
The athlete should first learn how to deadlift properly before learning the clean. The deadlift is pulling the bar from the floor through a hinge pattern with the arms straight and is complete when the athlete is fully standing up. The deadlift requires the athlete to stabilize their midline, use their glutes and hamstrings for power, and keep the bar close to their body by engaging their lats which will play an important role in learning the clean technique.
The Front Squat
The front squat is a foundational movement to the squat clean because the athlete will need to land in a front squat position to complete the movement. Therefore, athletes should have a good front rack position and master the front squat before moving on to learn the clean.
The Muscle Clean
The muscle clean is pulling the bar from the floor and receiving it in the front rack position without dropping under the bar or re-bending the legs. The muscle clean is a great variation of the clean for an athlete to improve their leg and hip drive as well as their ability to pull the bar and receive it quickly in the front rack position.
The Hang Clean
The hang clean is pulling the bar from just below the knee, just above the knee, or the hips and receiving it in the front rack position. Typically, a hang clean can be considered as any clean that has started from any position off the ground.
Hang Clean Variations
- The high hang clean, or “power position”, is where the clean is performed with the barbell starting at the hips.
- The hang clean, or “hang above the knee”, is where the clean is performed with the barbell starting just above the knee. This position can also be performed from just below the knee and is commonly referred to as the low hang clean.
The Power Clean
The power clean is pulling the bar from the floor, or any hang clean variation starting point and receiving it in a partial squat with the barbell in the front rack position.
The Squat Clean
The squat clean is pulling the bar from the floor, or any hang clean variation starting point and receiving it in a full front squat with the barbell in the front rack position.
All of these progressions are not only used to teach beginners how to learn the movement but also used by seasoned lifters to improve their technique and focus on different parts of the lift.
Jerk Progressions
Strict Press
The strict press is where the barbell starts in the front rack with elbows just slightly out in front of the bar. The athlete will press the barbell overhead while keeping the rest of their body static. Coaches will typically teach athletes the jerk by starting with a simple strict press overhead.
Push Press
As the athlete gets more comfortable with the strict press overhead, they will learn to incorporate their legs to produce power in the push press.
The push press is where the barbell starts in the front rack with elbows just slightly out in front of the bar. The athlete will dip straight down in a small partial squat (balanced in the feet, knees down and out), aggressively extend their hips for power and press the barbell overhead without dropping under the bar or re-bending their knees.
Push Jerk
The push jerk is where the barbell starts in the front rack with elbows just slightly out in front of the bar. The athlete will dip straight down in a small partial squat, aggressively extend their hips for power and press under the bar into a partial squat catching the bar with their elbows locked simultaneously as their feet hit the ground.
Split Jerk
The split jerk is where the barbell starts in the front rack with elbows just slightly out in front of the bar. The athlete will dip straight down in a small partial squat, aggressively extend their hips for power and press under the bar into a partial lunge, or split position catching the bar with their elbows locked simultaneously as their feet hit the ground.

Common Clean & Jerk Faults & Issues
Front Rack Position
Quite often, beginners have a difficult time reaching a full front rack position and end up holding the bar in their hands rather than letting it rest on the front of their shoulders. This can be caused by many factors, such as lack of understanding of the position or front rack mobility limitations.
Popping Bar Out & Around Vs Up
Another common fault is the hip pop or hip drive is for an athlete to thrust their hips forward rather than up. This can send the barbell out instead up, causing the athlete to jump forward to compensate for the weight shift.
Leaning Forward In The Dip/Drive Of The Jerk
The dip and drive in the jerk should be straight up and down. Sometimes the weight of the barbell in the front rack will shift the athlete’s weight forward in the dip and drive, causing the bar to go out and around rather than straight up.
Catching The Jerk Overhead With Bent Elbows
When catching the barbell overhead, the athlete should catch with their elbows fully locked out to optimize the movement. Due to many factors, such as timing or lack of body awareness, the athlete will catch the jerk overhead with bent elbows. This will lead to either a missed lift or less efficiency in the lift as the athlete will have to finish with a small press to finish the lockout.
Improving The Clean & Jerk
The clean and jerk is commonly programmed into CrossFit workouts as a standalone strength exercise as well as within the workout of the day. For this reason, many Crossfitters work tirelessly to master this complex movement.
When going for a maximal effort clean and jerk, the most common way for an athlete to lift the most weight is to squat clean and split jerk. Working through each of these progressions is a good way to improve the end goal of a full squat clean and split jerk.
It is highly recommended to have a great coach to help you master the progressions before focusing on increasing intensity.
Comment below if you've found any of the mentioned progressions helpful in your training.
