
Rowing.
It’s the form of cardio that we see programmed the most often in CrossFit gyms, as well as the Open.
Yet way too often, I see athletes doing it wrong…
Sometimes, very wrong.
Yanking at the handle… not using their legs… pulling back too far to the point where they’re almost flat… we’ve all seen this guy before:

Whether you’re brand new to rowing for CrossFit, or have been doing it for awhile yet - this article is going to break down the movement, optimal form, damper setting, myths, and more.
Rowing For CrossFit: The Basics
Let’s start with addressing types of rowers. If you’re here because you’re thinking about purchasing a rower yourself, this article breaks down the variety of rowers that are on the market, and the pros and cons of each.
Keep in mind, CrossFit HQ has somewhat strict standards as to which brands of rowers are allowed to be used within CrossFit competitions. If that’s something that matters to you, it’s best to stick with the Concept2 Rower - which comes in a variety of models.
Rowing: Foot Placement & Strap Set-up
Sit down on the rower, and position the straps across the balls of your feet - tight enough so that feet don’t move too much, yet still allow you to slide in and out during a workout.
Foot plates should be adjusted so the widest part of the foot is even with the strap. This is important for the drive phase, and pushing through the midfoot. This set-up will also adjust the angle of your hip when you come into the catch
What about the rower's damper?
Listen up. You should not be setting the rower’s damper as high as possible, ever.
Read that again.
It’s true that a higher damper will increase the power of your pull - increasing calorie and distant rates - but this also equates to a much higher amount of work that is needed for each pull… which isn’t necessarily beneficial. With the increased work requirement that comes with each pull, you’ll end up fatiguing more quickly and not being able to overcome the higher resistance of the damper.
The rower’s damper should be adjusted based off the drag factor. On a C2, you can find the rower’s drag factor under ‘more options’ on the main menu - read more about that here, or watch this video to see Coach Ben break it down!
Men should shoot for a drag factor of about 125, and women 110-115. Normally, this is around damper setting 6 for men, and 5 for women.

Rowing For CrossFit: Let’s Talk Technique
In order to understand the correct form that athletes should be using when rowing, let’s break down the row into phases:
- Catch
- Drive & Extend
- Drive & Open
- Drive & Draw
- Finish
- Recovery
Cool list - but what does it mean?
Rowing Step 1: The Catch
Rowing position should start in ‘the catch’ which is also where you’ll be finishing the movement. Sit on the rower with a strong, stiff back. You should be leaning forward, just slightly from neutral, with arms fully extended. Knees are bent, and shins should be vertical.
A note on heel position: The goal should be to keep your heels down. That being said, many CrossFit athletes have tight ankles… so my stance is that a small amount of heel rise is OK - as long as the drive phase initiates by pushing through the midfoot, NOT the toes.
Rowing Step 2: Drive & Extend
The drive is initiated by pushing through the heel/midfoot to begin extending the knee. During this step, your torso should be maintaining the same angle as step 1 (slightly forward).
Again, the main focus here should be to drive through the midfoot, not the toes.
Rowing Step 3: Drive & Open
Once the knees are past 90 degrees (moving towards extension), it’s time to begin to open hips. All the while, your arms naturally will begin moving back towards your body, yet you shouldn’t be focusing on pulling - continue to focus on your legs.
Rowing Step 4: Drive & Draw
Now it’s time to think about your arms. Once the hips are open and legs are fully extended, draw your arms back and bring the handle of the rower to your chest - the bottom of your sternum. Wrists should be in line with forearms, and elbows draw back.
Key: Note that elbows should draw back - NOT up and wide. Keep them close to the body.

Rowing Step 5: Finish
This step is technically just the slight pause that occurs once the draw has been finished. Your body should be leaning back just slightly (think: 1 o’clock) with your legs straight, arms pulled in, wrists still in line with forearms, and the handle at the bottom of your chest.
You’re ready to complete the movement and move into the recovery step.
Rowing Step 6: Recovery
Recovery is the portion of the movement that takes us from the finish, back to the catch (the start of the row). This is done in exact reverse order from the drive. Push your arms away, and once extended, lean at the hip so that your body moves forward into the 11 o’clock position.
Bend the knees, and draw your body back into the Catch position (step 1).
Rowing Technique: Common Faults
Let’s take a look at some of the most common faults that we see when it comes to rowing for CrossFit.
Faults in the Catch (starting position)
- Shins are past vertical
- Heels aren’t flat - athlete is starting on their toes
- Reaching/leaning too far forward (torso should be angled at 11 o’clock)
- Reaching the handle all the way to the flywheel
Faults in the Drive
- Collapsing forward when extending legs (should only be leaning slightly forward)
- Opening the hips too soon (this normally happens when the butt slides forward)
- Pulling the arms first (think: legs first)
Faults in the Finish
- Pulling back too far (or laying back completely)
- Elbows pulling out
- Pulling the handle too low, or too high
Faults in the Recovery
- Initiating with knees first instead of arms.
- Keeping elbows bent - this puts athletes in the incorrect position when starting the Catch
Rowing & Pacing
On the monitor of your rower, you’ll notice a box that displays S/M. This stands for strokes for minute, and is a good way to track your pace.
Generally, I advise shooting for a stroke rate between 22- 28 per minute. If we maintain a high stroke rate, the resistance of the wheel will feel lighter, as you are not letting it slow down as much between reps.
For the more visual learners out here, check out the technique breakdown that I give after CrossFit 19.1 was released.
Rowing For CrossFit: The Wrap Up
So after reading the step by step breakdown on rowing for CrossFit, and checking out the most common faults - where do you stand? Is your rowing form perfect and ready to go, or do you have some adjustments to make?
Remember, correct rowing form is important when it comes to efficiently completing workouts. Give these tips a try, or share this with a friend who has been struggling with rowing.
Is improving your rowing a goal that you're working on? Check out our article on goal setting, and how to set yourself up for success.
Ever start a workout thinking “Doesn’t look too bad, I’m gonna crush this!” only to wind up gassing out after the first couple minutes of a 15 minute WOD? It doesn’t feel good on your body or your ego. But it’s a problem you can fix.

Like most of you reading, I’m not that into “cardio” in the traditional sense of going for a run or hopping on a treadmill. Like most Crossfitters, I prefer lifting heavy and doing short, intense metcons. That preference sets us up as athletes to ignore more traditional cardiovascular training - putting ourselves at a disadvantage during longer WODs.
If I had to pinpoint the time when I was in the best cardio shape of my life, it was definitely while doing lots of endurance and interval training for a half marathon row at my Crossfit gym.
So, how can you build your CrossFit conditioning and improve your endurance for metcons?
The simple answer is to practice more, as I had to while training for the half marathon row.
If you wanted to get better at double unders, you’d need to spend dedicated time working on double unders. Likewise, if you want to get better at the Assault bike, you’re going to have to spend some extra time on the Devil’s tricycle.
The cool thing about building Crossfit endurance is that it doesn’t matter which modality you choose (running, rowing, biking, dubs, or what have you) so much as how you approach your conditioning workouts, which I’ll get to in a second.
First, let’s talk about how to get better at the two main pieces of Crossfit cardio equipment - the rower and the air bike - so you can smash your cardio workouts.

How to get better at the Assault Bike or the Rower
To improve your performance on the Assault bike and Concept-2 rower, you first need to understand how these machines work. Specifically, there are a couple numbers to focus on.
For the rower, it’s your split and strokes per minute, indicated by “s/m” in the top right corner of the erg’s display. Your split measures how long it will take you to row 500m at your current pace. Strokes per minute obviously tells you how many times you complete a “rep” on the rower in one minute. Both measurements are in “real time,” meaning they will change with subtle changes in your pace and stroke rate.
For the Assault bike, it’s your RPM or watts - they are equivalent measurements, like pounds and kilos. RPM stands for rotations per minute and is similar to strokes/minute on the rower. Watts measures the power you’re putting into the machine. Since there are no gears, RPM will always be equal to power.
Whichever piece of equipment you’re training with, you’re going to want to have a fast split or high RPM/watts during sprints, and a consistent split, stroke rate, RPM, or /watts for mid- and long-distance workouts.
The other piece to improving your bike/row game is efficiency. Just because you’re “doing cardio” doesn’t mean technique goes out the window. As with snatching or any other movement, there’s a right way to row and bike.

Each stroke on the erg is made of a pull and a catch. You begin the pull by driving your feet into the foot rests, pushing with your legs. You’ll finish the pull with your arms before starting the catch, or recovery. Here, you will perform the movements in the exact opposite order: push the arms away, hinge at the hip and then bend the knees.
(Rower Pro Tip: do not try to to a big breath in when in the catch)
Key coaching points for the rower:
- keep a tall, upright posture;
- eyes forward (looking down makes it harder to breathe);
- eyes open so you can see the monitor;
- actively push with your feet and pull with your arms on the rower;
Key coaching points for the bike:
- keep a tall, upright posture;
- eyes forward (looking down makes it harder to breathe);
- eyes open so you can see the monitor;
- push with both your feet and arms, they’ll naturally come back as the other side works;
- synchronize your breathing with your work on both machines.
These tips will improve your efficiency on the rower and air bike so you get the most out of your training, increase your endurance, and avoid gassing out halfway through long WODs.
Want more detailed rowing coaching? Check out this WODprep article: Rowing For CrossFit: Form, Technique & Common Mistakes
How to use the rower/bike to improve your endurance
You probably know that metabolic conditioning means training your metabolic pathways - your body’s energy systems - to run more efficiently.
What you may not know is that our bodies produce energy using several different means. The three major metabolic pathways that provide energy for our muscles are: the phosphagen pathway, the glycolytic pathway, and the oxidative pathway.
Don’t worry, there won’t be a quiz on these systems. Technically, these systems work together to produce energy, but different time domains draw from the systems in different combinations. Since each metabolic pathway contributes different amounts of energy source for varying amounts of time, you have to train each pathway to improve your overall conditioning.
Keep in mind that though we’re talking about the energy systems individually, they are always mixed when we’re moving. Each system contributes different amounts of energy, depending on the duration of work you’re doing.
In order to train each of the three pathways, you’ll need to do a mix of short sprints, mid-range intervals, and long aerobic workouts. Just like when you lift weights to get stronger, you need to create “progressive overload” with these different cardio workouts by doing more work or using longer intervals or shorter rest as you improve.

You can do any of those types of workouts with any equipment, from running and rowing and biking to traditional metcons mixing up different CrossFit movements. Again, it’s not about the tool you use, but how you set up the workouts.
The rest of this article explains how to hit each energy pathway so you improve your CrossFit conditioning and endurance.
Metabolic pathway #1: Phosphagen
Your goal is to produce as much power and do as much work possible in a short amount of time. Think 100m repeats running or rowing.
This kind of activity relies on your phosphagen pathway, which produces quick bursts of energy but can’t sustain that power for very long.
When sprinting, you should rest for more time than you work. A work-rest ratio of 1:10-20 is appropriate, depending on the duration of the sprint. The higher intensity the sprint, the more recovery time your phosphagen pathway requires. As the length of the bout increases, the “percent of maximum power” must be lower thus allowing a “quicker” recovery relative to the time of work.
Below we have a Table from Essentials of Strength and Conditioning. This is a rough guide of work to rest ratios we should generally follow.
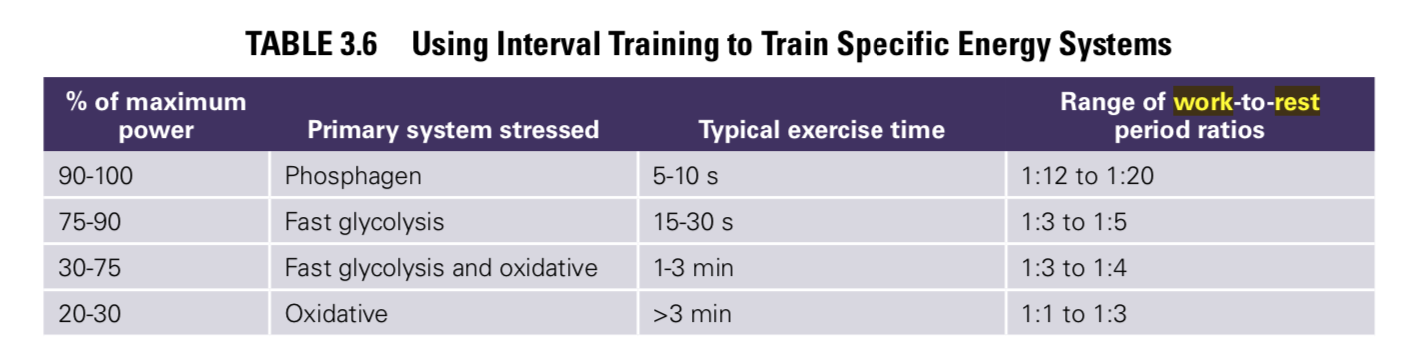

For example, if each sprint of a 8x10 Calories on the Assault Bike takes you 10 seconds, then you should rest for 120-200 seconds between efforts. It doesn’t need to be that exact, but you get the idea. You can progressively decrease rest times as you become more fit, but only if you’re able to maintain consistent times on the repeated efforts.
Metabolic pathway #2: Mid-distance (Fast/Slow Glycolysis)
Workouts or efforts lasting 30s-5 minutes are powered by the glycolytic pathway, which produces less power than with sprinting but lasts longer. You know the feeling of starting out hot on the rower, then feeling the “burn” after 45 seconds or so? That’s where your body has run out of sprint energy and transitions primarily to using energy from the glycolytic pathway.
Your pace won’t be as fast during these workouts, but you’ll be able to sustain your effort longer. Rest doesn’t need to be quite as long - a 1:3 or 1:5 ratio of work to rest is plenty if you’re pacing yourself appropriately. For instance, say you’re doing a 2-minute row for calories. You could rest 6 minutes between efforts and be sufficiently recovered to hold your split in the next round. As your conditioning improves, you can rest even less. ****Now remember these are max effort attempts for that time domain which will show very “maximum Power % as the time increases). Most of the time, in CrossFit, we take an 80% approach to a 2-4 minute workout so that we can rest 1:1 and be back on it. For a lot of rounds.
Metabolic pathway #3: Long aerobic
It’s likely your CrossFit box doesn’t program too much long aerobic work because, well, it takes a long time that could be used for lifting or building skills. But you’re missing out on a lot of endurance benefits that way.
If you're serious about improving your engine, prioritise your long aerobic workouts for a set period of time rather than simply tacking them on to an already full program.
“Long aerobic” workouts can be defined as anything longer than 20 minutes and are generally done at a consistent pace, though you can do intervals as well. An example of aerobic intervals would be 30 rounds alternating between 1:00 at 40 RPM, 1:00 at 55 RPM on the Airdyne (or whatever pace would be “easy” and “medium” for you).
Point is, you should be able to maintain the same pace for the duration of the workout.
Bottom line: Don’t skip long aerobic work.
Long cardio workouts may not be as sexy as PR’ing your deadlift, but it will improve your CrossFit endurance and your performance in WODs across all time domains.
Still confused about how to program cardio for yourself? Take the guesswork out of your conditioning and get in peak shape with WODPrep’s Endless Engine course.
To connect with author Katie, follow her on Instagram or check out her website.
Tired of burning out too quickly in a WOD?
Sign-up for our soon-to-be released 'Engine guide to the Open'.
Is rowing a good exercisr for me as I have Spondlylisthis L4 and L5 also spinal Stenosis
Hey Bernadette!
There are no inherently dangerous exercises for Spondy or Spinal stenosis as everyone experiences different symptoms with these injuries.
Dont be afraid to row Either. It is very safe.
If it terribly painful then you may not be ready yet but if it is pain free or just minimally discomforting, then you are good to go!
As a moderately experienceed rower, indoor and on the water, the advice to keep your heels down, or almost down, for the whole stroke sounds wrong to me. Lifting your heels towards the catch with your shins still vertical gives you another couple of inches of length which is key to efficiency. Placing them down at the start of the drive and then ramping up the power once your feet are down, pressing through the heels, would give you more bang for your buck and stop the machine from sliding forwards across the room. Rowing short is good to get the flywheel spinning initially, but to row fast it means you need to apply more power in less time. Somebody with the same fitness and a longer stroke will outperform you. This is also why rowers tend to be tall.
Hey josh.
Thanks for the input.
You definitely have more experience than I.
But based on the research I’ve done and the collegiate and Olympic rowers I’ve learned from, this is the most accurate advise that I was able to give. I assume their are other ways to teach it, but heels up is not one that I have come across.
While a longer pull will create more power per each pull, usually when you see someone reach further (heels up) they compromise their torso position as well which may not yield the most efficient pull?
You mentioned elevating the heels and then creating force by slamming the heels. Again, Not bad advice, but a much harder thing to teach since most people are toesy in the rower anyways and it creates more room for Error.
Great article. I learned rowing from an rower. Exactly as you describe! Well done!
Thanks for reading Andy!