If you don't know how to do kipping pull-ups yet, I'm going to make a wild guess: you hate Fran.
Imagine you've just walked into the gym with your friend, and you see "Fran" programmed up on the whiteboard...
Fran:
21-15-9
- Thrusters (95/65 lb)
- Pull-ups
You each have different reactions...
“Awww man, this is going to take us forever without being able to do kipping pull-ups yet!” you say, warming up your shoulders.
“Speak for yourself. I finally figured out how to do kipping pull-ups last month. I’ve been working on my kip coordination before and after class,” your friend grins back at you.
Sure enough, the coach counts down - 3, 2, 1, GO! - and you’re left in the dust. If you don’t know how to do kipping pull-ups for a fast-paced workout like Fran, odds are you've been left behind on several other benchmark workouts like "Helen", "Barbara", "Murph", and "Cindy".

But maybe you don't even care about being competitive. Maybe you just want to figure out how to control the kipping movement in the first place, or maybe you’re trying to finally learn how to string together more than a few kipping pull-ups.
Either way, if you're ready to learn about all things kipping pull-up related, then this article is full of tips for you. Side note: if you're struggling with shoulder pain during kipping pull-ups, check out this article.
How To Do Kipping Pull-ups: Kipping Basics
The movement of kipping pull-ups actually evolved within gymnastics as a way to be able to accumulate more pull-up volume. The theory was this - do enough strict pull-ups in a row and eventually your body will naturally start trying to kip in order to stay efficient and keep accumulating reps.
This "necessary" gymnastic kip has evolved over the last 20 years to become a movement in it's own category. For those who say "a kipping pull-up isn't a real pull-up" ... they're right. It's a kipping pull-up. It's a totally different strength/skill hybrid. In the sport of CrossFit®, it's an essential skill that must be learned in order to complete some of our WODs in an efficient manner.
Yet as an athlete, how do you know you’re strong enough to do kipping pull-ups? As a rule of thumb, I always advise that athletes should not attempt kipping pull-ups until they can do at least 3-4 strict pull-ups in a row. Similarly, I wouldn't recommend learning butterfly pull-ups until competency with kipping has been achieved.
If you don’t have 3-4 strict pull-ups yet, don’t sweat it. We have a great guide for that too!
As you know, high volume pull-ups are an extremely common movement programmed across many workouts. If you take the time and put the effort into learning kipping pull-ups efficiently, it is going to pay off big time across your workouts in the future, resulting in faster scores!
Kipping Pull-ups: Movement Breakdown
1. Correct Pull-up Grip and Body Position
From the standing position underneath the bar, jump up and grip the bar just outside of your shoulders. As a coach I highly recommend that you wrap your thumbs fully under the bar in a "gymnastics hook grip", versus wrapping your thumbs over the top of the bar in what I call the "suicide grip". With the thumb around and under the bar, it helps to ensure that you don’t fall when your grip gets tired.
To initiate the kipping movement, begin with your body in a tight, hollow position, with your arms pushing down and away from the bar to send your body backwards. Avoid closing the hip angle here (bringing your legs up to 90 degrees) The kip should be controlled by your shoulders and core, not your legs swinging back and forth at the hip.
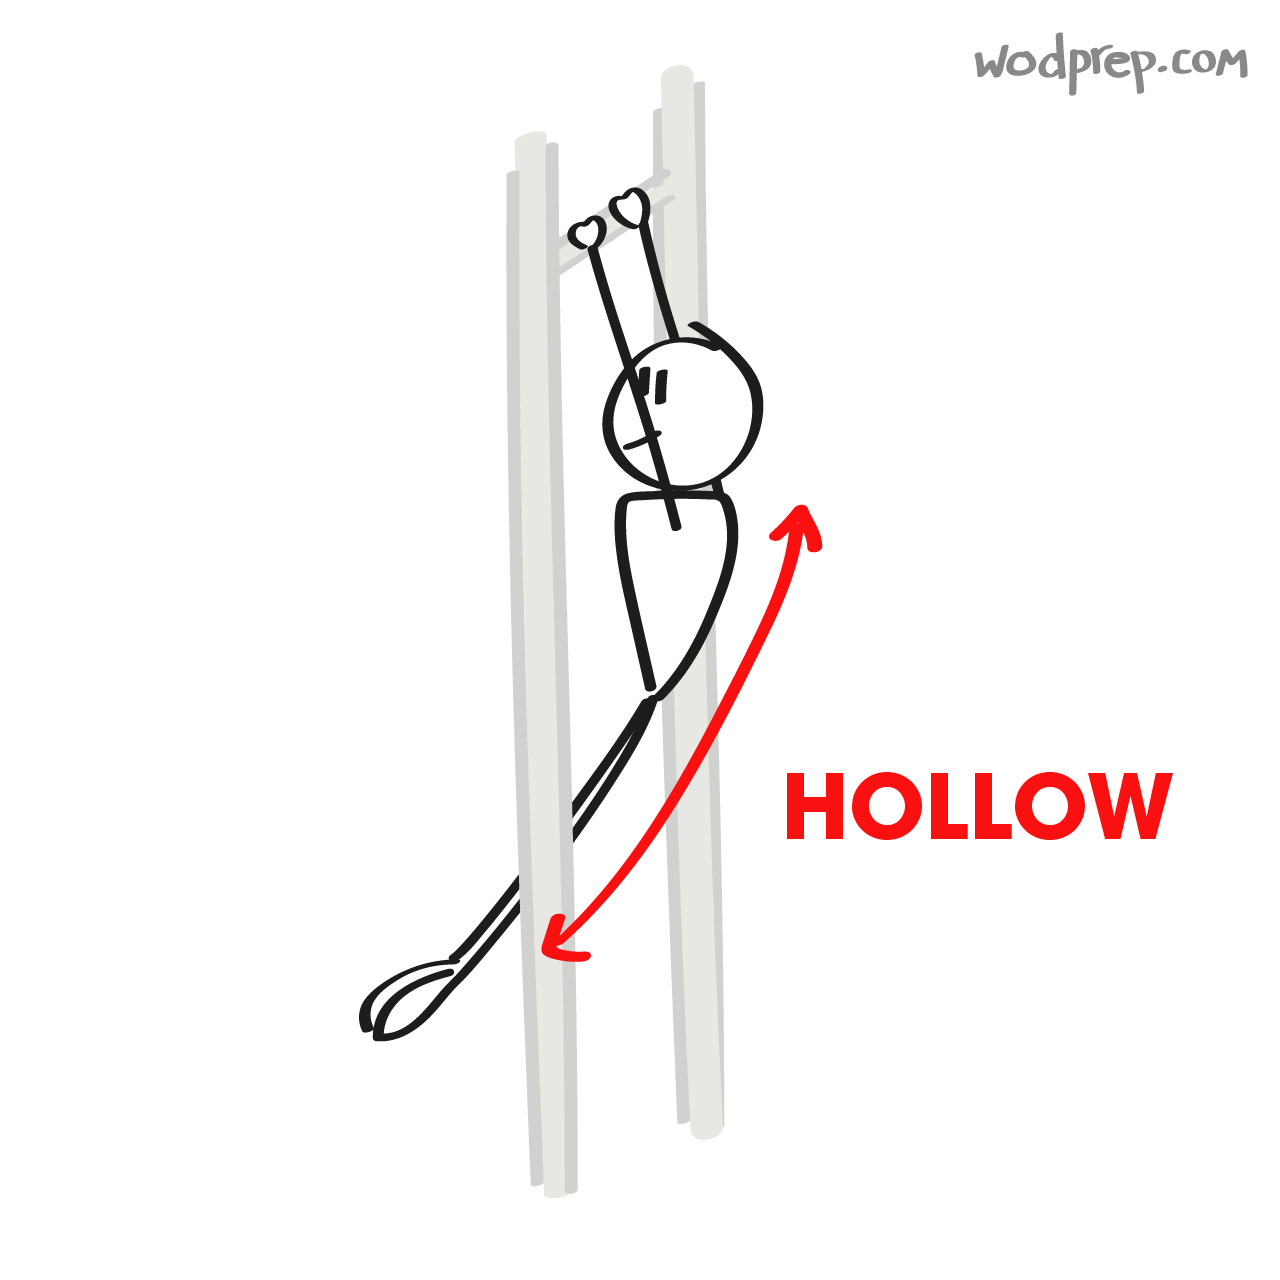
Sidenote: I get a lot of questions about which ‘grips’ to use for kipping pull-ups. If you haven’t checked it out already, we have an entire blog post on CrossFit® gear (and how you don’t really need most of it) which will help to answer that question.
2. Pull-up Arch Position
Once you have actively gone into the hollow position, think about ‘relaxing through’. While we want you to maintain tension all the way through your pointed toes at all times, this relaxing of your shoulders will help keep the movement fluid as you send your head through the window your arms have created. In this strong arch position we want to avoid breaking at the knee to maximize tension and create more torque. Notice how the lovely stick figure athlete has straight legs. Be like the stick figure!
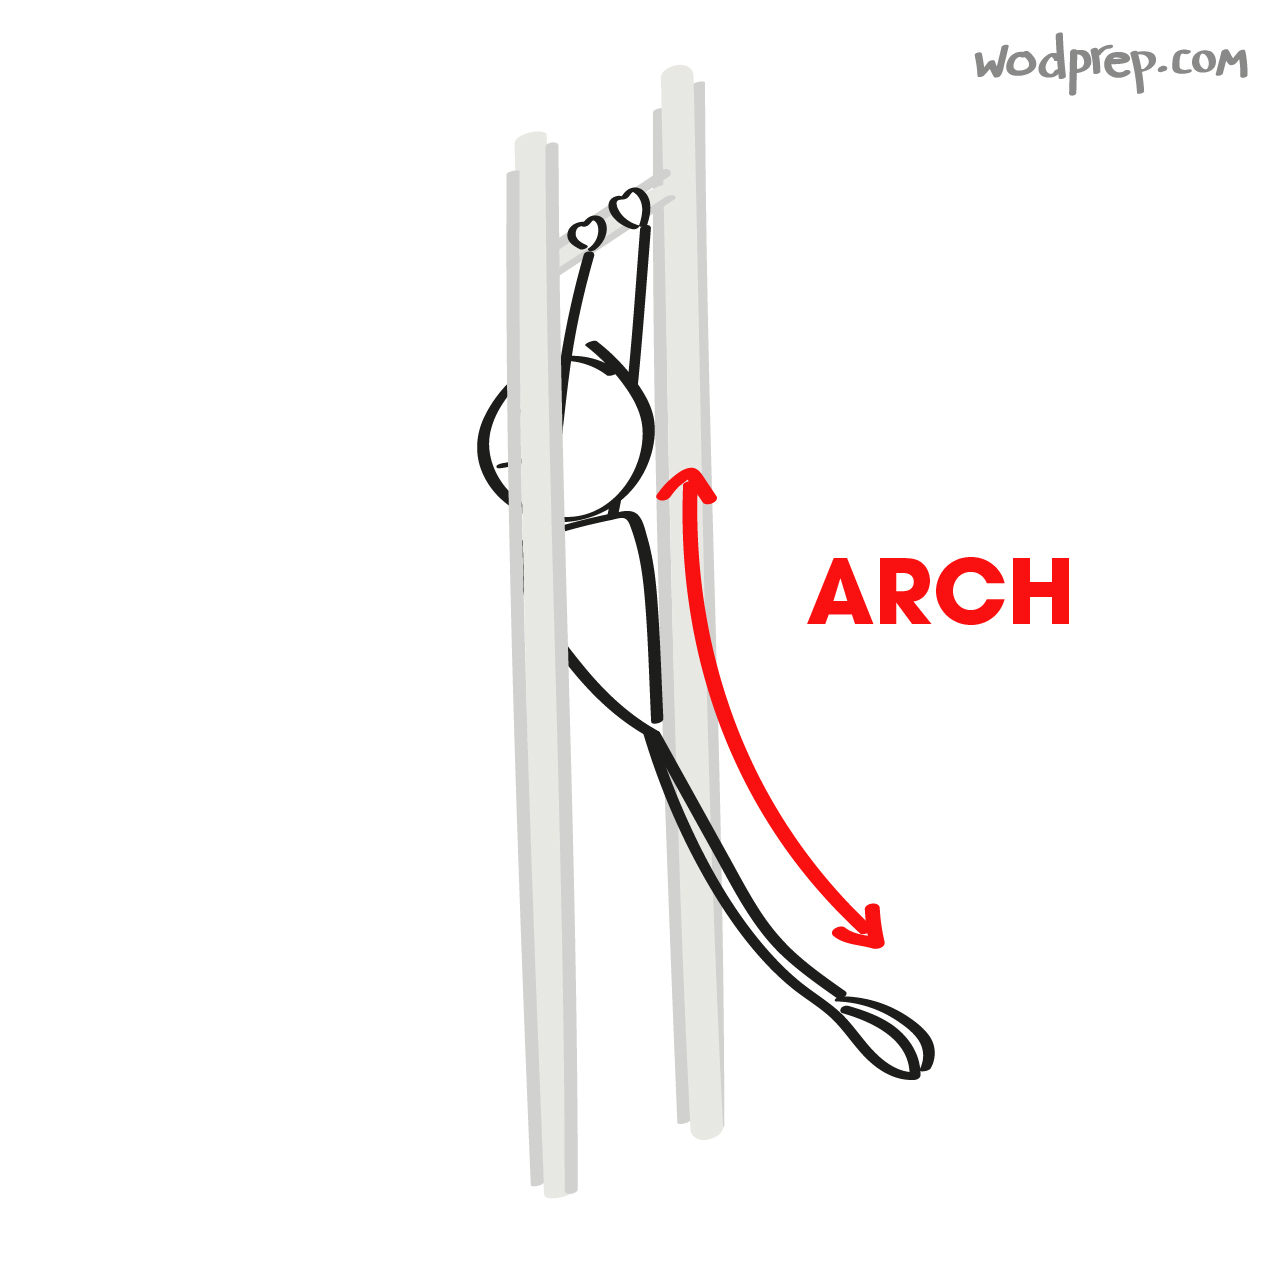
A great drill to work on your arched position is called the ‘Arch snap’ which is actually done laying face down on the floor. Check it out:
3. Kip "Up and Away"
Move back under the bar, kipping upwards and ‘closing’ your body back into a hollow body position. As you move back into your hollow position, this time think about lifting your knees slightly to close the hip angle. This will prepare us for the ‘hip pop’ in the next step. Momentum from your arch position is going to be key in order to get your chin up and over the bar.
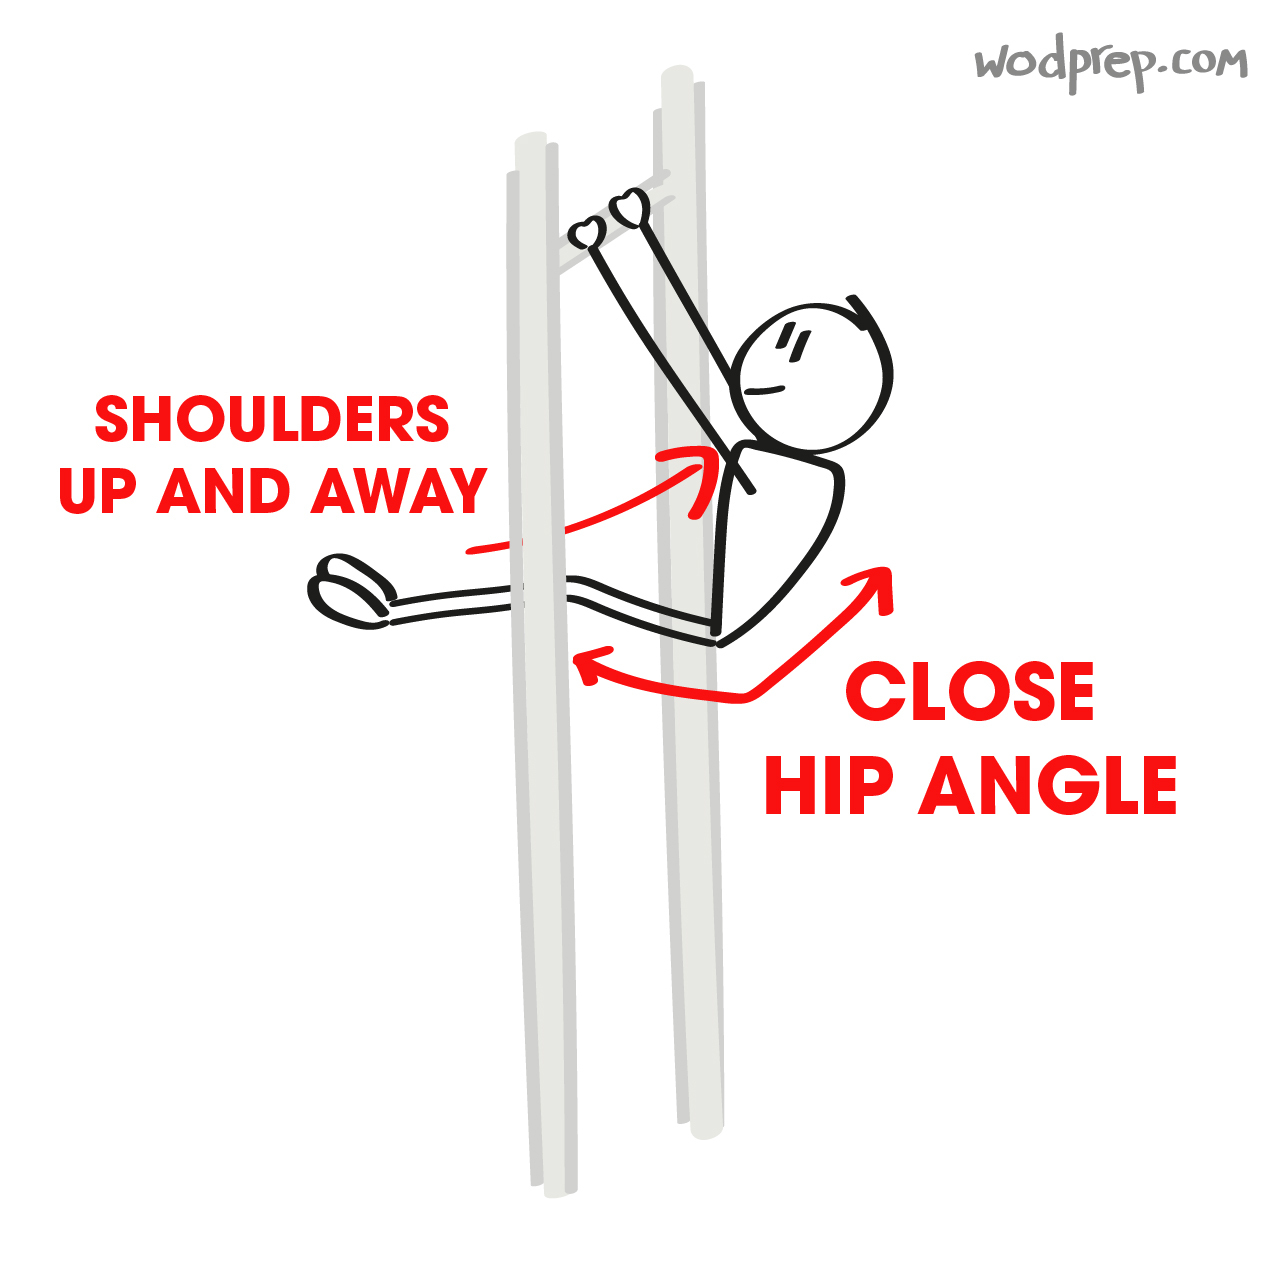
For this step of the kipping pull-up, your shoulders should be moving ‘up and away’ from the pull-up bar. A lot of athletes confuse this movement for just ‘up’ yet moving away from the bar is equally important.
4. Hip Pop!
When learning how to improve your kipping pull-up performance, this is a key part of the movement that I often see athletes missing.
As you’re drifting up and away from the bar, you are going to hit a point of weightlessness. It’s quick, but at this point you could actually quickly move your hands on and off the bar and not go flying across the room (this is actually a drill that we use with our athletes who are learning bar muscle ups in our Bar Muscle Up Mastery course).
Milliseconds before you hit that weightlessness point - or the apex - is when the hip pop comes in.
As you float up towards the bar with that slightly closed hip angle (and towards the point of weightlessness), pop your hips open quickly, and then pull yourself directly into the bar. You could call it a "hip thrust" or a "butt squeeze" depending on which gives you the best mental image. Here's a stick figure hip-popping like a champ:
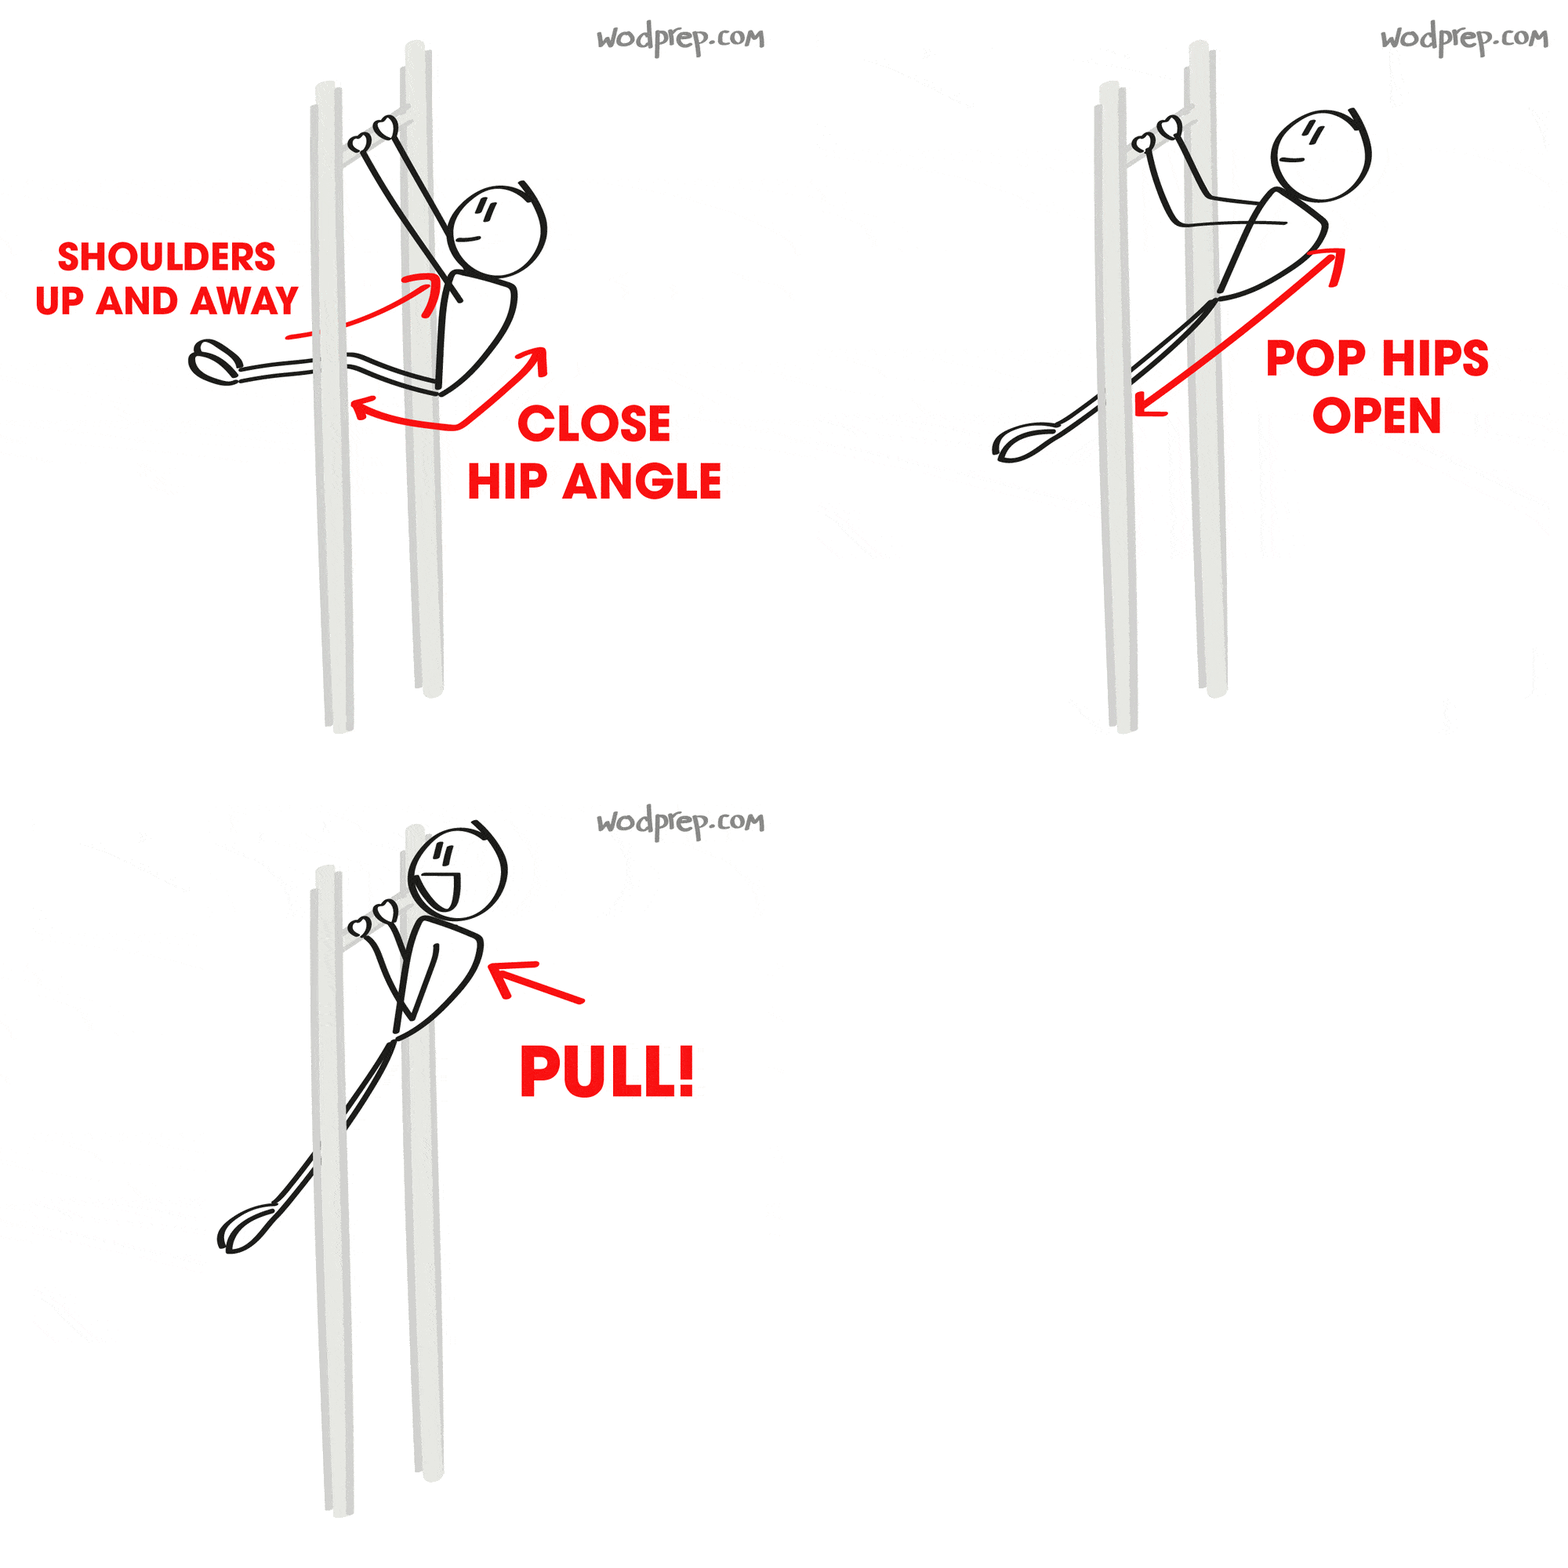
I’ll say it again: let your shoulders rise up, pop your hips, and then pull up to the bar. In real time, the pull may look like it happens at the same time as the hip pop, but slow it down and you’ll see that they happen in very quick succession. Delay the pull and you lose all momentum gained from the hips.
5. Elbows and Shoulders Down During the Pull
Why does it matter which direction your elbows are pointing?
One word: Power.
If your shoulders and elbows are pointing back instead of down, you’re losing out on pulling power. Try to instead keep your elbows down, and you’ll get more bang for your buck out of your pull, since you’ll be using your biceps and more of your back muscles.
Just like many other gymnastic movements, efficiency is key. The tiniest changes to the movement can be a game-changer when it comes to large sets of kipping pull-ups in workouts.
6. Push Away
Outside of the hip pop, pushing away and back into hollow is another super important part of the kipping pull-up movement that is often overlooked. Yet without it, you can quickly lose momentum.
Right after you finally get your chin above the bar in a neutral position (basically completing one rep), you will then push back away. Essentially you’re pushing your shoulders back to where they originally came from, moving back into the hollow body position. As you push away, move your feet in front of you, keeping your legs and core tight.
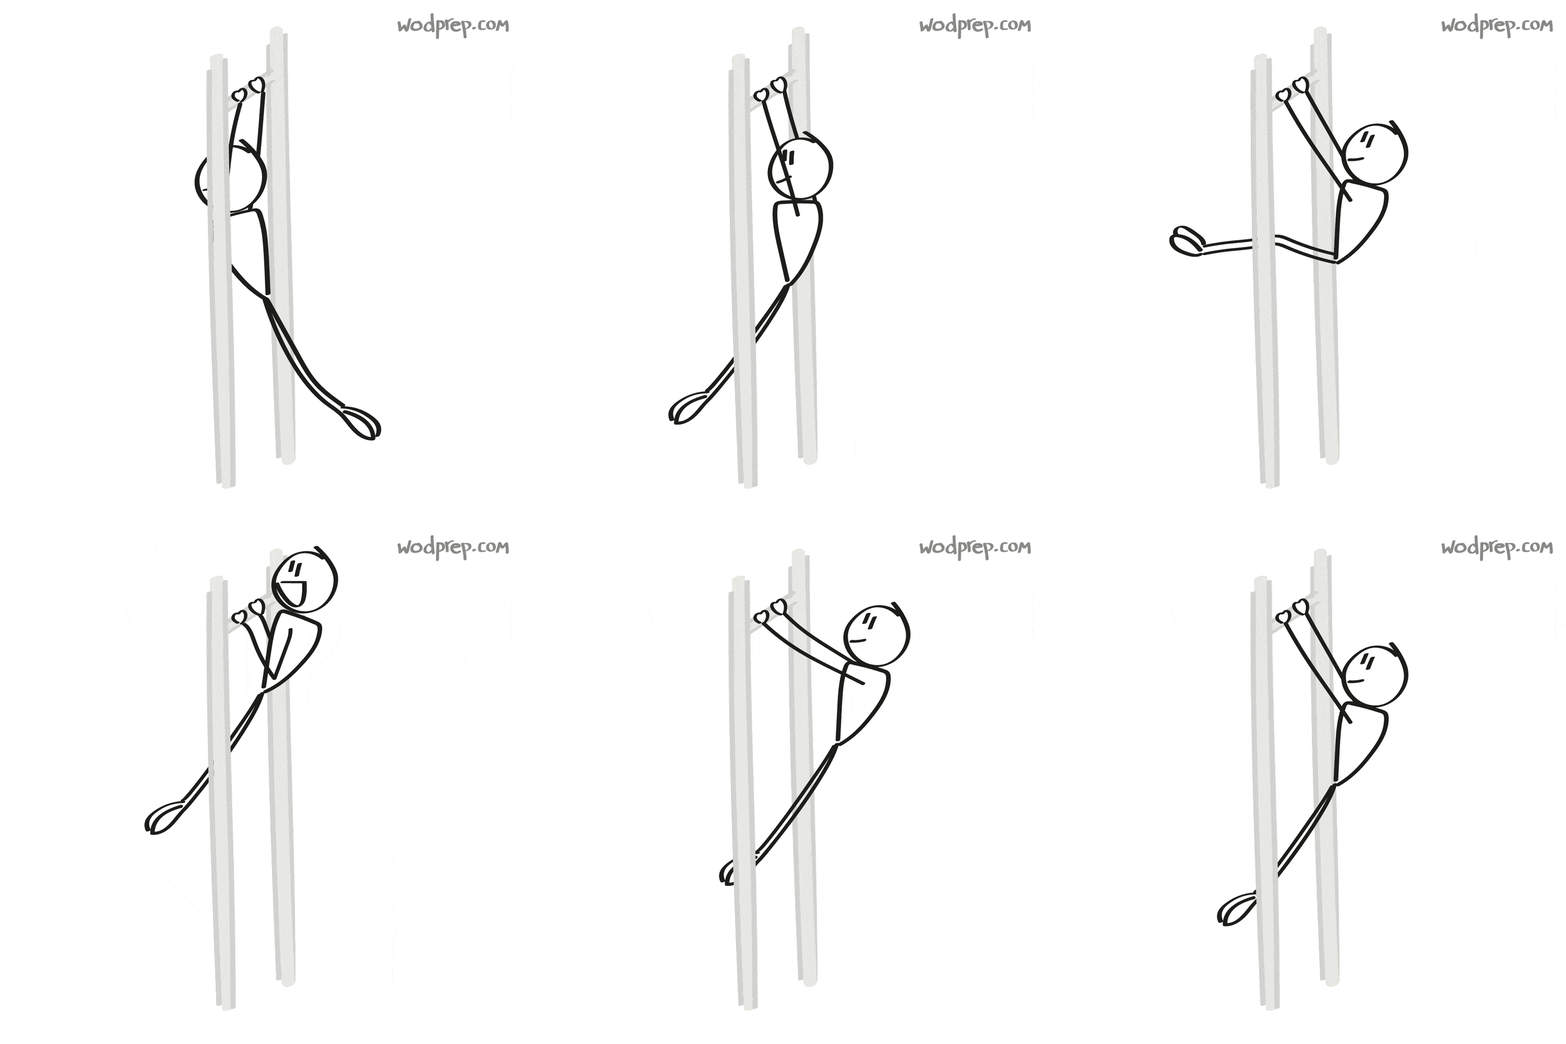
Think of it like pressing rewind on everything that you did to get up and over the bar.
Push your shoulders away, move your feet into a hollow body, then pull yourself back into the arch position under the bar (Step 2 above). With this you'll have the momentum and tension you need to kip back into your next rep.
How to do kipping pull-ups in unbroken sets (My best tips!)
If you’re first starting out with the movement and still getting comfortable, I don’t recommend that you string together large sets of kipping pull-ups. Start with a few small sets, and work up gradually across time (a few weeks) as your shoulders get used to the new movement.
When moving onto bigger sets of kipping pull-ups, it’s crucial to make sure that you follow all 6 steps in the above progression. If you don’t have any gaping holes in the movement, you’ll be able to keep generating momentum and continuing stringing them together for as long as your grip allows.
Work on building up your capacity by hitting about 50-60% of your max effort set as repeats. For instance, if I can only do 10 kipping pull-ups unbroken but I want to expand that, I could try out a workout like this:
8 min EMOM:
- 10 burpees
- 6 unbroken kipping pull-ups
In a workout like this, we are training the body to execute kipping pull-ups under a bit of fatigue. We're not going to max effort (which would destroy our hands), we're simply trying to get comfortable hitting a solid set, with good form, every time.
Eventually, you can build up to 7 reps, then 8, then before you know it you’ll be consistently hitting sets of 10 reps, which used to be your max effort.
Kipping Pull-ups: Accessory Work
If your grip needs a rest from hanging on the bar, but you’re still looking to work on those pulling muscles, try a few of these accessory exercises that will help you to continue to build your kipping pull-up strength:
- Inverted Row
- PVC Lat Pull-downs
- Bicep curls & Bent Over Rows
Adding a little bit of variety to your training and hitting some of those smaller muscles that are often neglected will help keep your upper body healthier, and able to handle a higher volume of kipping.
Kipping Pull-ups: The Missing Piece
If you find yourself following all of the above steps, but are still losing your kip after a few reps… or doing the dreaded “tarzan swing”, then odds are you are missing "balance". Balance is the missing piece.
What I mean by that is, your body positioning may be good, but you’re just missing balance in your kip. An unbalanced kipping pull-up will have a little extra sway in the kip, eventually throwing you off and causing you to lose rhythm -swaying forward and backward.
A great exercise that will help you work on this is called the "kip stop", and is pretty simple. Hop up on the bar, practice a few controlled kip swings (not a full pull-up) and then come to a complete stop. Not not a slow, natural stop, but instead force your body to stop on a dime, abruptly.
If you can’t stop, and find yourself still swaying and swinging when you try to stop, then this is indicating that you definitely have a balance issue with your kip. Keep working on kipping in a more controlled manner, and eventually you’ll find yourself able to kip stop much easier.
Ready to improve your performance in workouts like Fran?
Hopefully at this point, you understand the kipping pull-up movement and how to break it down. Now it’s up to you to take the time to practice. It might not come overnight... kipping isn’t always as easy as some athletes make it look.
Devote some time before or after your training sessions, start with small sets, and you’ll be knocking out Fran unbroken before you know it!

Hi Ben,
The clarity and accuracy of you explanations helps me a lot to learn and improve, so thank you very much (and sorry in advance for my rusty english)
I was watching in your “How to do kipping pull ups” that you release your thumbs when you are pulling in to the bar. So, my question is that if there is a slightly regrip in the pull up?
Many thanks
Best regards from Argentinian Patagonia
Hey Willy!
Good catch! Not many people notice that slight re-grip 😉
It’s not something you “need”, but depending on how aggressive your hip pop & pull is, you might find yourself naturally re-gripping the bar.
When it comes to Bar Muscle Ups, though, then this re-grip is essential. I think that naturally I allow my hands to get a little loose during the apex of the kipping pull-up simply out of habits developed in my kipping BMU practice.
[…] Open. I had been working on them for over a year at that point…. and in 2016, after mastering kipping pull-ups, decided it was time to take on bar muscle […]
Love this page!!!
[…] chest to bar pull-up is just like strict or kipping pull-ups, except you’re just pulling yourself a little bit higher – […]
Thanks for the great article with detailed steps Ben. I just ripped a callus on a heavy pullup day and decided to go for some grips. Two questions: Do you have any advice on 2 vs 3 hole grips? I watched your video and it sounded like your pinky callus is protected with 3, but I’ve never noticed that finger getting as much wear on my hands as the middle two.
And second, do you grip thumb around the bar over your fingers (like in your kip stop video) while wearing the gymnastics grips, or do you keep your thumb on top of the bar?
Fyi I posted here and on the YouTube video you linked, wasn’t sure which might be checked more frequently, thanks again!
I really like 3-hole grips, and so does Coach Ben!
Also, we ALWAYS suggest wrapping your thumbs around the bar, not over, as this creates a stronger grip.
Ultimately, it all comes down to your preference, so try testing multiple versions and you’ll find the best fit/grip for you! 🙂
Hi, nice guide but I have a problem.i can do 5-8 unbroken strict pull ups but after 2-3 kipping pull ups I start to swing way more than the “kip” and lose my kip.do I miss a step? Or should keep practicing? Thanks
Sometimes that can happen when you get off balance- so you always want to think of keeping your body balanced underneath the bar. If your feet are in the front of the plane, your shoulders are behind and visa versa- if your feet are behind the plane, your head and shoulders are in front. Think about keeping that balance. I would suggest working on your beat swings to help gain more control and definitely keep practicing!